Improve customer engagement with our modern form builder


Forms are a fundamental element of all modern digital strategies. Whether you have a simple website with a single contact form, you take orders using a multi-step checkout process, or you’re using surveys to carry out market research, web forms allow you to interact with customers, capture information, and act on it to serve your customers and drive your business forward.
So, as part of our move towards making Contensis a composable digital experience platform, we’re pleased to announce the release of our forms builder.
It allows you to create forms, surveys and questionnaires using the same drag-and-drop experience you’re used to when building content types. And when your form responses start rolling in, you can now view and filter them in a similar way to entries, with the ability to manage columns, search and filter, and export responses to CSV making it easier to manage large volumes of responses. If you want to manage responses in another system, you can automatically post form data to other systems throughout your tech stack using webhooks and Zapier.
Create forms easily with a no-code drag and drop form builder
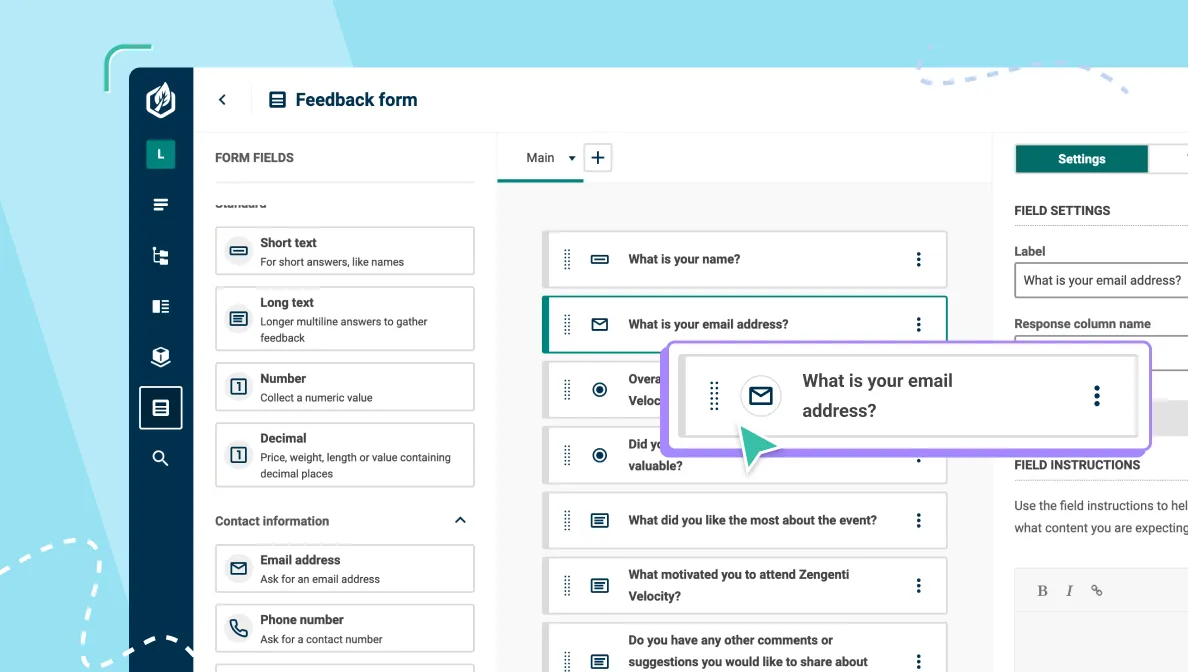
We've taken our familiar drag-and-drop content type builder and adapted it for creating forms. So, you'll be able to lay out a form in the way that you want using tools similar to those that you've used when building content types.
Just like the content type builder, the new forms builder supports a wide range of field types, with even more coming in future releases.
You can also add hidden fields to forms, just as you can with the classic module. These are fields that aren’t displayed to a user when they fill in a form, but instead store data added by code in your front-end application. These are useful when you want to programmatically store data in a form response, such as a value from a cookie or the URL of the page from which the form was submitted.
Creating forms is a permissioned action, so we’ve created a new Forms permission type that you can use to control who can create and edit forms. As with content type permissions, you can grant a Role permission to update, delete and publish individual forms. So, you might grant your Marketing Team role permission to create new forms and to update, publish and delete all other forms except your Freedom of Information Request form, which might only be edited by a Data Protection Officer role.
Auto-verify form fields to easily get clean, error-free data

To ensure you collect high-quality and consistent data, you can add validation rules to your form fields. You can make a field required, check it matches a specific pattern defined by a regular expression, specify minimum and maximum values for number fields, or set character limits on text fields.
When you add validation to a field, you can use built-in error messages or replace them with your own custom error messages that suit your style. For example, rather than use the default ‘Email address is a required field' message, you might use your own message that says “We need your email address to keep in touch”.
Organise long or complex forms into multiple pages
Long forms can be off-putting to users and can lead to lower form completion and conversion rates than you’d get if you used fewer fields. In fact, Hubspot analysed 40,000 of their customer landing pages and found that three to five fields seems to be the sweet spot for high-converting forms.
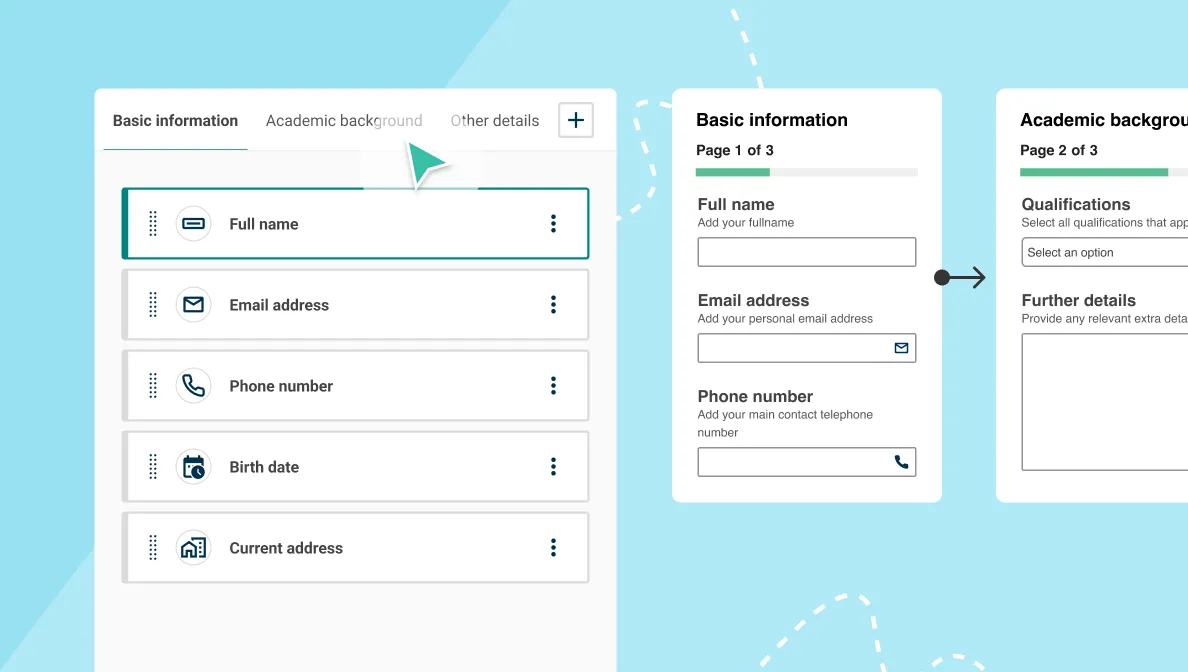
Of course, reducing the number of fields in a form isn’t always an option. Job applications and checkout processes, for example, usually require far more than five fields. To help you improve the user experience in this situation we’ve provided the ability to organise long or complex forms into multiple smaller pages.
Every form starts with a single page. Once you’ve added one or more extra pages, you can reorder the pages, move fields between them, and give each one a short description. This description will be displayed in the rendered form and can help your visitors understand the intended purpose of the fields in the page.
Users can navigate between the pages of multi-page forms to edit their response before they submit it. You can customise the text labels of the Previous, Next, and Submit buttons to suit your audience and use case.
Autosave a user’s progress in long forms
We now support the ability to set a form to autosave. Previously, when filling in multi-page forms, users had to submit the form in one go, which could be time-consuming. If they were interrupted – say by a power cut or by accidentally closing a browser tab – they might lose their progress and have to start all over again. With autosave enabled, if a user accidentally closes their browser or steps away and returns later, their progress is automatically saved. This allows them to continue filling out the form from where they left off. This feature is set individually for each form, allowing you to control the autosave progress for each one. By default, the autosave progress is turned off. Auto-saved responses are stored locally in the browser, so if a respondent clears their cache or their cache is cleared automatically when closing the browser, their response data will be lost.
Display different confirmation messages or pages based on field rules
Generic confirmation messages or thank you pages can often feel cold, impersonal, and a little unsophisticated. How much better would it be if you could show users a personalised message or page based on how they answered your form?
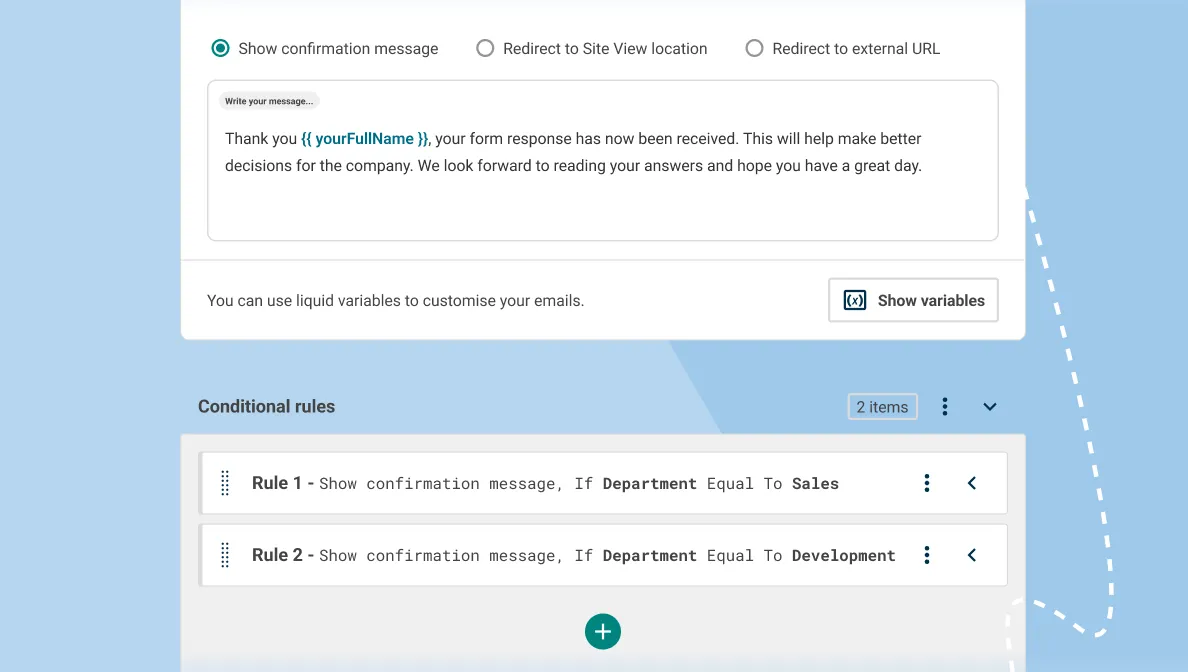
You can now show a personalised confirmation message, send a user to a Site View location, or redirect them to another URL based on the data they provide in their response.
For example, if you have a form which allows users to specify the nature of their enquiry from a dropdown list, you could show different confirmation messages or pages depending on the option a user chooses from this list. If they choose General enquiries you might show them a different message than if they choose Freedom of information request or Sales enquiry, for example.
This personalisation is powered by a new rules engine. A rule is based on one or more conditions being met, based on Field, Operator and Value selections. In our enquiry type example above, we might have a dropdown list field in our form called Enquiry type with options for the three different types of enquiry. We could then create a rule to forward users submitting a freedom of information request to a specific page when the field is Enquiry type, with an operator of Equal to and a value of freedom-of-information-request.
If you choose to display a confirmation message, you can also use Liquid variables to insert data that the user provided in their response, such as their name or email address, in a similar way that you might have used merge tags in other email platforms.
Customise notification emails
While an on-screen confirmation message lets a user know that their form has been successfully submitted, it’s a good idea to send an email to the address they provided to reassure them that they entered it correctly and that you’re dealing with their request.
Equally, unless you’re keeping a close eye on the form response screen, you’ll probably want to know when a user submits a form.
The Email notifications screen in the form builder allows you to configure auto-responders and team notifications to send an automated response to each user who submits a form and to notify team members instantly when new form responses are received.
We’ve also made the new rules engine available in email notifications to allow you to customise auto-response messages and team notifications. You can use this to customise the message a user receives in their auto-response message or to make sure internal notifications are sent to the team members best suited to act on the user’s request.
You can also use Liquid variables to insert data from the user’s response such as their name or form reference number into both autoresponders and internal notifications to remind a user of the information they provided and give team members an at-a-glance overview of the response.
Set expiry dates on forms
There are scenarios when you only want a form to be open to responses for a limited period of time, say when you are using a form to allow people to register for an event and you want to close registrations ahead of the event.
You can set a form to expire at a specific date and time to ensure that it can only be filled out as long as you want to receive responses.
This is also useful when you are conducting a survey and want the survey to close at a specific time so you can begin processing the data.
Preview and test your forms as you build them
If you’ve ever published a form only to realise a day or two – and hundreds of responses – later that you missed off a vital field, we can relate.
To help avoid this, we provide a custom form preview that you can use as you build your form to check that it has all the fields that you need, that you're providing clear validation messages, that the page by page sectioning makes sense, and that the names and descriptions are all valid.
If you populate and submit the form preview, you’ll see how your response would be processed in a real-life scenario based on the data you’ve entered.
You’ll see the confirmation message that a user will be shown or the page they will be redirected to, any auto-responses or email notifications that will be sent, and how the form response data will appear when it is saved.
View and manage form responses
When your form responses start rolling in, you can view and filter them in a similar way to entries, with the ability to manage the columns on screen, search and filter data, and export responses to CSV – making it easier to manage large volumes of responses.
While the form response screen uses a similar interface to the entries listing, you’ll find a separate listing for each of your forms. When you open a form response for viewing you can use arrow buttons in the page header to navigate between other responses from the same form.
New permissions allow you to control who can view and manage responses from your different forms, while new workflow features allow you to mark responses as read or assign them to team members.
Control who can view and manage form responses with granular permissions
Along with controlling who can create and edit forms, you can also specify who can create form responses, mark them as read or unread, archive or delete them and unarchive or restore them. We’ve also introduced view permissions to allow you to control who can view the responses from your forms.
Like the new Forms permission type, Form response permissions apply on a form-by-form basis, allowing you to control which Roles can view each of your form’s responses.
This is invaluable when you’re managing forms that gather sensitive information, such as employee data, which should only be viewed by people with the appropriate authorisation.
Filter responses
To find specific responses more easily, you can filter them by keyword, workflow state, and time period they were received.
You can also filter responses by the team member that they’ve been assigned to, so if a colleague is off sick or away for a period of time, someone else can easily pick up their work.
If you’d like to search historical responses, you can easily toggle archived and deleted form responses on and off.
Give each form response a unique reference number
To make it easier to distinguish between form responses, each one is given a unique reference number at the point it is created.
You can set your own prefix in the forms builder to help you quickly identify which of your forms generated the response. For example, you might prefix responses from your General enquiries form with GEN, or freedom of information requests with FOI.
If you’d like to make users and team members aware of a form response’s reference number when the response is created, you can automatically insert a reference number into confirmation messages, auto-responses, and notification emails simply by adding {{reference}} into the relevant message field in the form builder. This is especially useful when it comes to discussing a newly received form with your team members or if a user contacts you to follow up a response they’ve submitted.
Mark responses as read or assign them to another team member to review
To make it easier to manage large numbers of form responses we’ve provided a simple read and unread workflow. When you view a response you can mark it as read in the same way you would publish an entry or send it for approval. All new form responses are created in the unread state and will display an Unread status in the form response listing screen. If you accidentally mark a form as read you can easily change its status back to unread at any time.
You can also assign a form response to an individual team member. This helps to ensure accountability and improves response tracking. When you assign a response to a team member, the response is marked with the assigned team member’s name and they will receive an email notification informing them that they have been assigned the response.
While this feature can be used to distribute form responses between team members to help share the workload, it can also be used to assign form responses from catch-all forms such as a general enquiries form to the person best placed to act on that form response.
Export responses to CSV
Sometimes you need to upload form responses to another system. It could be that you need to add respondents' email addresses to an email marketing platform, or maybe you want to analyse survey responses in a spreadsheet.
To make this easier, we’ve added the ability to export form responses to CSV. You can export all responses for a selected form, or only those responses displayed on the current page.
Only the columns visible in the form response screen will be exported to CSV. By default you see all the data for a given form in the response listing, but you can refine this using the managed columns option in the Table options dropdown to reorder, add, or remove columns.
Delete or archive historical responses
To ensure you comply with data protection regulations such as the GDPR, you can set form responses to be automatically deleted after a specified period of time. This can be customised on a form-by-form basis from each form’s settings panel or set at a project level, allowing you to set a default retention period for each form that is created in that project.
Alternatively, you can archive a response which lets you retain it indefinitely, preserving a historical record of submission data without cluttering the response screen.
Using forms in your websites and applications
Being able to create forms and process responses aren’t much use if you can’t easily use your forms in your digital experiences and start collecting responses. With this in mind we’ve gone out of our way to make it easy to use your forms on both Contensis and non-Contensis websites and apps.
Add forms to entries
To make it easy for authors to add forms to your web pages, we’ve added a new Resource picker field that allows you to add a form picker to any content type, component, composer or Canvas.
When adding a form picker to a content type, you can specify which forms authors can add to an entry, whether that’s one specific form, several different forms, or all forms in your project.
Authenticated forms
When you need to restrict form submissions to those within your organisation, such as for a staff survey or an application process, you can enable the “Requires sign in” setting. This setting ensures that only users who are logged into your organisation’s intranet can access and submit the form. By requiring a sign-in, you can confirm that the respondents are authorised members of your organisation, thereby enhancing the security and relevance of the collected data.
This is achieved by adding a Form response create and update permission to a role that is used by your authentication system. If a user is not logged in, you can display a message informing them that they need to log in to submit a form response.
Easily render forms in your site using our forms render package
To help developers get up and running as quickly as possible, we’ve created an NPM package that you can use to render forms on your websites.
It’s WCAG 2.2 compliant, handles field and page validation out of the box, and has built-in support for storing form data in local storage if you have autosave enabled on your form
The package uses modern CSS, with easily overridable custom properties, making it easy for you to update themes to make your branding and design system.
We’ve also provided the ability to protect your forms from spam and bots by including support for Google reCAPTCHA v3. Like autosave, this can be enabled on a form-by-form basis from the form builder.
Streamline your form workflow
Some forms might require multiple teams to deal with responses or have data that needs to be passed to third-party systems. When you’re dealing with hundreds or thousands of form responses a week in an enterprise project, it’s not realistic to handle this manually.
To make it easier to manage form responses at scale, you can use custom workflows to set up your own multi-step processes that allow you to efficiently manage and track forms as they pass between multiple teams or use our integration options to pass form data to external systems such as an email marketing tool or CRM platform.
Custom workflow
While forms come with a basic read and unread workflow, you can harness the power of custom workflow definitions to create multi-step processes. These advanced workflows allow teams from different departments within your organisation to manage responses that require collaboration. By implementing custom workflows, you ensure that form submissions are efficiently routed, reviewed, and addressed by the appropriate teams, enhancing both collaboration and the thorough handling of each response.
Forms integrations
Zapier
Easily connect form data with over 3000 applications using the Zapier platform without involving a developer. Whether you want to add responses to a Google sheet, send a message to a Teams channel or sync a response to Salesforce, you can easily integrate your forms with your favourite applications using our preconfigured Zap templates or set up your own custom Zaps from scratch.
Webhooks
Rather than relying on traditional notifications of new form responses via email, use webhooks to automatically kick off a workflow, add users to a subscriber list, push content into a CRM or synchronise data with a third-party system.
We’ve added webhooks for understanding when a new form response has been created, deleted, updated or been passed through a workflow stage. Use any of these triggers to handle form submissions in different scenarios.
The custom payloads and Liquid templating available in Contensis webhooks let you specify the exact data and structure expected by your endpoint, making it even easier to integrate with services that have an incoming webhook feature.
Upgrade now
The new forms builder is a licensed feature available in Contensis 16.1 – check out the other new features available in this release.
If you're an existing Contensis customer, get in touch to discuss upgrading to the new forms builder with your account manager.
